recent posts

Showing posts with label ALTERED ART. Show all posts

Saturday, 12 September 2015

M for Mabel: Mixed Media Block Letter for Colourarte


Hi Guys! I'm back again with a video tutorial for Colourarte.

Since this is my first official video tutorial for Colourarte, I decided to alter this block letter deco piece 'M' for my initial that I got out of our local novelty stationery store, Typo.

Enjoy the quick and simple video tutorial!


Here are some of the close up shots. :)


That's all for this post!

If you like my video tutorial, please press the 'THUMBS UP' button and subscribe to my channel as I will be bringing you more video tutorials for the next few months. 

Leave some love the comments section and let me know what you think!

Thanks n See ya!


Thursday, 30 July 2015

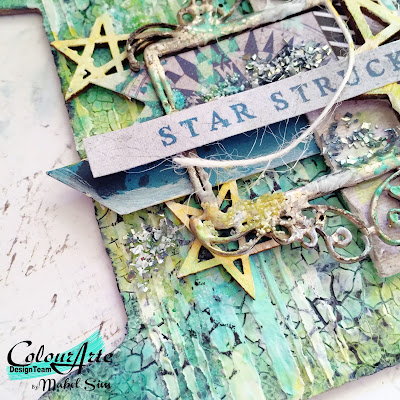
Process Video for Starstruck ATC with Colourarte


I'M HERE TODAY TO SHARE A GOOD NEWS!

I've been selected to be part of Colourarte's new Video Design Team! YAYY!
I'll be sharing more videos for Colourarte in the future so do stay tuned to my process video!
Click on the Colourarte logo below to view other DT members!

For today's post, I'm sharing something I did for Colourarte's Challenge #2: Textures. I love how wide this theme covers, there isn't much restrictions on the rules of the challenge, so do take part in it! You can view more details by clicking the picture below!


Here are the close-up shots I did for this challenge. I chose to the leftover holder for Prima's trim as an ATC.


Here's a process video I did.


Supplies Used
13arts - Black Gesso
13arts - 3D Glass Microspheres
Liquitex - Modelling Paste
Liquitex - White Gesso
Liquitex - Heavy Matte Medium
Ranger - Clear Crackle
Dylusions Spray - White Linen
Memento Stazon - Jet Black
Tsukineko - Versamark Ink Pad
Prima Marketing - Finnabair Honeycomb Clear Stamp
Prima Marketing - Finnabair Platinum Glass Glitter
Prima Marketing - Leftover Holder for Trim
Studio Calico - Stars Wood Veneer
7 Dots Studio - Destination Unknown Collection
2Crafty Chipboards - Frames Tiny Henry's Chipboard
Stampendous - Aged Silver Embossing Enamel
Tim Holtz - Stripes Stencil

That's all for today! 
Leave some love at the comments below and tell me what you think!
TIA!

Sunday, 29 March 2015

Prima Marketing's PPP March Challenge

Hi Guys!

It's been awhile since I last blogged. I'm glad I managed to squeeze out some time to craft. My colour scheme was inspired by Prima Marketing's PPP mood board. 


Look at all those lovely shades of green and teal! 

I first painted my box with black gesso from Prima Finnabair, and let it dry thoroughly before I add more paints.


As usual, I got too engrossed with layering paints that I forgot to take pictures in between step. Sigh~

Anyway, to achieve this result, I painted a coat of white crackle texture paste from Prima Finnabair. I had actually experimented it a couple of times. I realised Prima crackle has finer cracks as compared to Ranger's, the whole cracked look was pretty neat as the cracks are fine, it serves well as details. 

So I added thick coats of white crackle and I think I completely covered the black gesso base. Haha. I let it dry naturally as I realised the cracks look nicer that way as compared to heat dried. I proceeded with the colours using 13 Art's Pastel Spray in Blue and Teal (I think) mixed with teal mica powder by Prima Finnabair. I also added tints of yellow from Shimmerz to give it some highlights. 

Then I watered down my Prima Finnabair white and black gesso and splattered it all over the box. When everything was nice and dried, I mixed Kaisercraft's Gloss Varnish with a tad bit of Marion Smith's Whisper powder. I HAVE TO SAY, that thing is crazy sparkly, so used with caution! Hahah. So I painted the varnish all over the box to seal the paints. 


Embellishment time!

All of these flowers are from Prima. I added some paper leaves die cuts from Maggie Holmes as well as altered the flourish chipboard die cut from Sizzix Tim Holtz with Prima Finnabair White Sand Texture Paste with my yellow Shimmerz.


Before adding finishing touches, I got distracted by my paper collections and start playing with patterned papers instead. Haha. Anyway, I pulled out this patterned paper from Prima's Sunrise Sunset Collection and cut it down to size to fit my box.


I watercoloured it such that it'll fit the colour scheme.


For the inside of the box, I picked this chevron patterned paper from Maggie Holmes. 


And there you have it! The final look of my altered box!
:)


I brushed a light coat of gesso on the flowers to help them blend in better as well as give the flowers some highlights. I added some clear dewdrops from Robin's Nest. I also mixed glass beads with Clear Gesso and gold mica powder from Prima Finnabair (used clear gesso instead of soft gel just because it was beside me, haha). I poured from bronze glitter on top of my mixture while it's still wet such that the glitter will adhere to my self-made texture paste. 

Here are some close-ups.


I used tart tins! :)))


The cracks are so gorgeous! 


So that's all for today!

I'm glad I made this altered box in time for the submission of March's PPP. Haha.

Seeya soon! 

Let me know what you think of the box! :)


.